There has never been a better time to create a website, specifically setting up a Shopify store website.
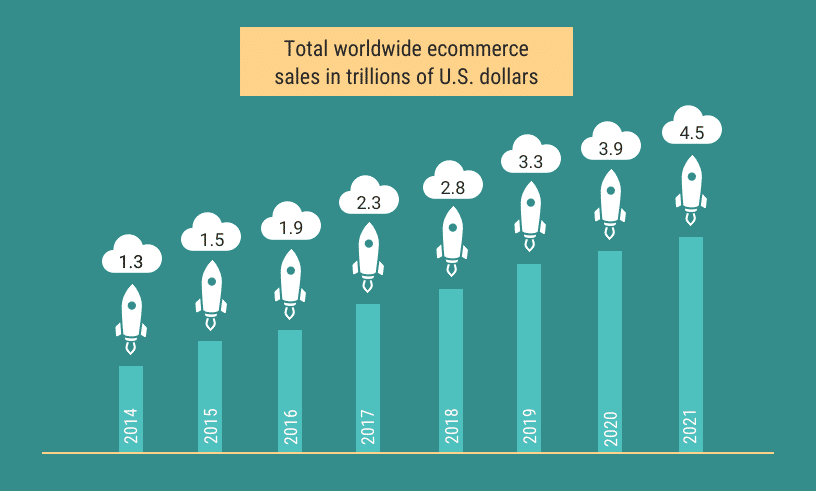
Due to the COVID-19 outbreak, people are interested more than ever in how to start an ecommerce business. Look at the growth of ecommerce.
I will be discussing in detail how to create a Shopify store from scratch. But first, let me address one question you might have at this point.
How much does is cost to start a Shopify store ?
Shopify offers a 14-day free trial. After the trial ends, you have three pricing options.

The basic option is recommended for setting up a new store.
After setting up a Shopify store, I recommend starting a blog to connect to your store.
A blog will help you convert visitors to customers who land on your blog posts. So without further ado, let’s get started.
- How much does is cost to start a Shopify store ?
- Step 1) Sign up for Shopify
- Step 2) Add products & details
- Step 3.) Create key pages & product variants
- Step 4.) Configure shipping settings
- Step 5. ) Set up ecommerce SEO
- Step 6.) Customize your store
- Step 7.) Select your tax settings
- Step 8.) Set up payment processing
- Step 9.) Prepare for launch
- Step 10.) Launch your ecommerce store
- ecommerce FAQs
Step 1) Sign up for Shopify
When you first sign up for your free trial, Shopify will ask you to name your store. Your store name will become your default URL (e.g., sitename.myshopify.com).
The only way you can customize your URL is to purchase a unique domain name (e.g., yourstore.com)
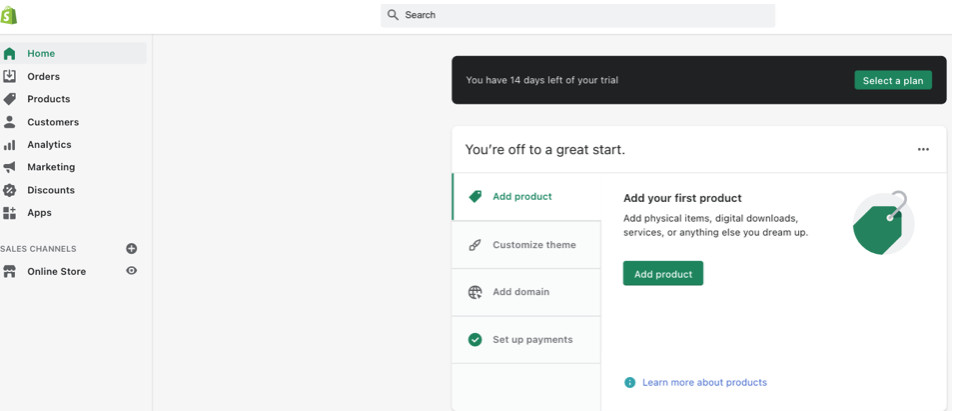
After you have answered a few questions in the initial sign-up phase, you will be directed to the Shopify main account page.
Before I continue, here are a few prerequisites for setting up a Shopify store.
- A logo design, I recommend using canva.com to create a logo.
- Products to sell, I recommend using a product sourcing service.
- Photos, I recommend using jpeg file extensions for SEO purposes.
If you need help setting up your Shopify store, use the search bar at the top of the page to be directed to helpful resources.
Before we move on, make sure to sign up for the 14 day free trial. Feel free to open a new tab on your computer to follow along for step-by-step guidance on how to create a Shopify store.
Step 2) Add products & details
To add products to your Shopify ecommerce store, navigate to “Products” click “Add product.”
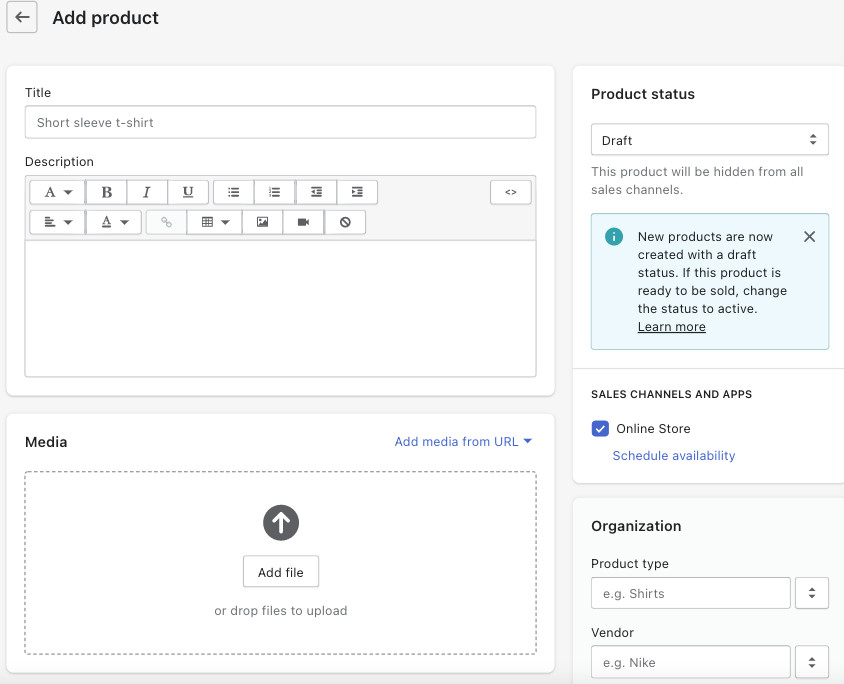
That is the simple part, but you will have to perform more actions to set up details around the products you add to your store.
How to write a product title
Aim to use shorter page titles. Visitors browsing product category pages scroll fast.
As visitors browse your category product pages, the goal is to quickly highlight a product that captures a visitor’s interest from product titles.
When writing a product title, refer to a proven formula one of the biggest retailers online uses.
Take a look at Amazon product titles. Amazon uses what I call the BTDC formula. BTDC is an acronym that stands for brand, type, detail, and count.
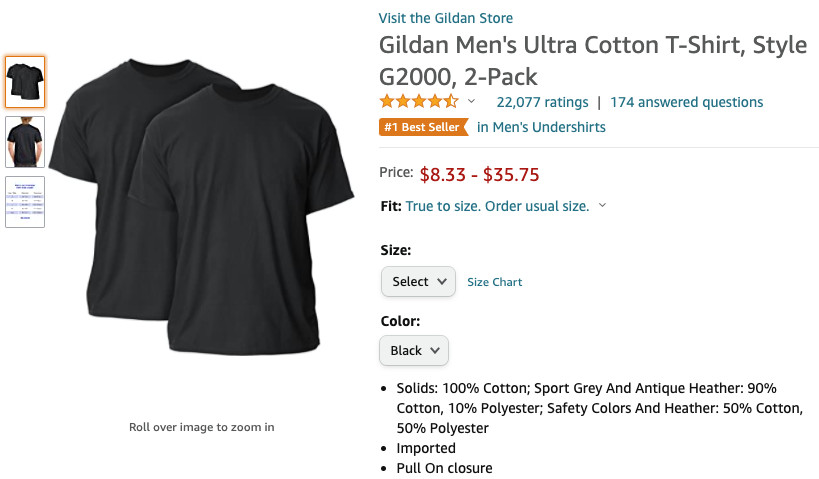
For example, the following product title from Amazon “Gildan Men’s Ultra Cotton T-Shirt, Style G2000,2-Pack.”
- Brand: Gildan
- Type: Men’s
- Detail: Ultra Cotton T-Shirt
- Count: 2-Pack
Armando Roggio from practical ecommerce wrote a post on product naming for Amazon. If Amazon, the world’s largest ecommerce storefront, follows this formula for product title naming, you should also for your products.
How to write product descriptions
PDPs (product description pages) are crucial to the success of setting up a successful Shopify store.
Product pages help visitors decide if they will purchase your items. When it comes to writing content for Shopify product description pages, you will have to include specific details. You will also have to consider your communication style.
Here is an example of an excellent product description:
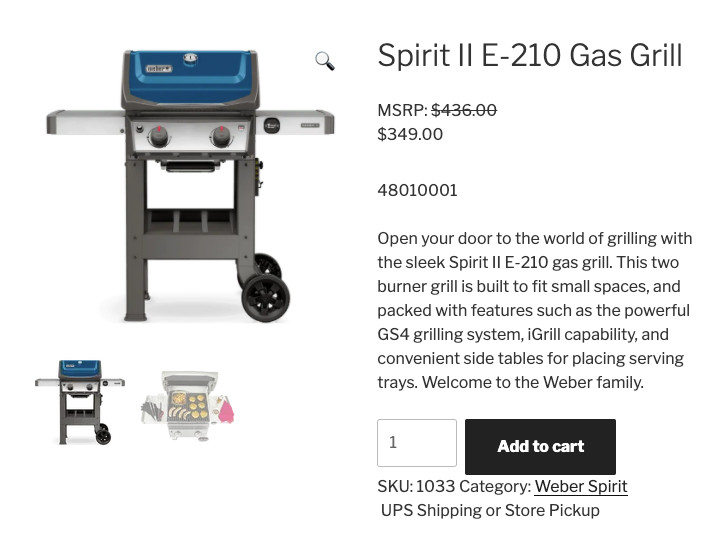
Let’s take a close look at this:
“Open your door to the world of grilling with the sleek Spirit II E-210 gas grill. This two burner grill is built to fit small spaces and packed with features such as the powerful GS4 grilling system, iGrill capability, and convenient side tables for placing serving trays. Welcome to the Weber family.”
Here is why this description is brilliant:
The Features
“Sleek…two-burner grill built for small spaces.”
“GS4 grilling system.”
“igrill capability”
The Benefits
“Convenient side tables for placing serving trays.”
“Welcome to the family” (Inclusion in something bigger)
As you can see, the potential customer’s needs are addressed multiple times with features and benefits.
As a bonus, they make you feel like you are being accepted to something bigger as being part of a family/lifestyle.
This example is sales copy at its finest. A big thank you to Elaine Stone from Wordstream.com for this example.
Growth hack tip#1
Research major ecommerce descriptions for a directive of how to write your descriptions. Major ecommerce stores run A/B split tests to see an increase in sales velocity.
A/B testing tests two slightly different versions of the same page. The goal is to see which variation creates more sales.
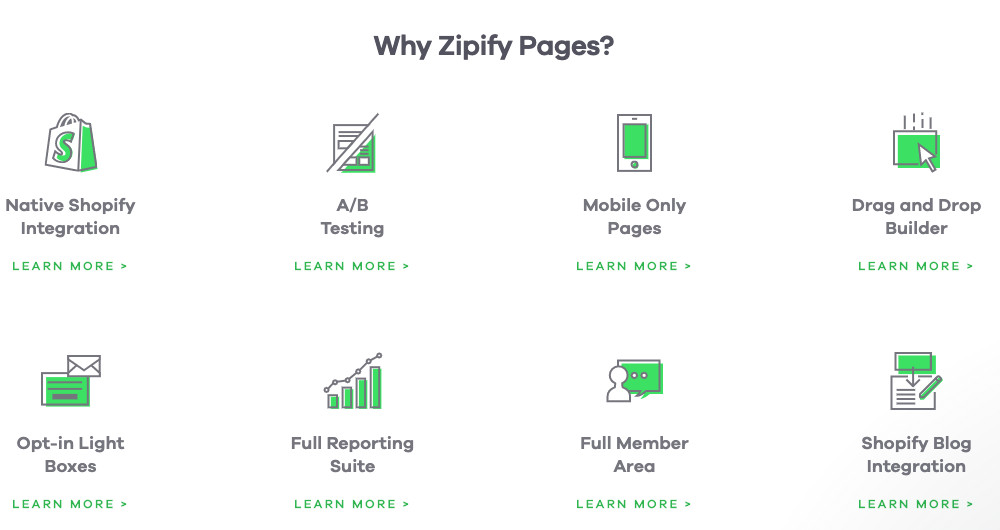
I suggest using one of the many useful Shopify apps offered from the Shopify app store called Zipify for A/B testing.
It does not require coding knowledge to set up. This app also offers a suite of tools that are just as helpful.
Zipify is known for developing one of the best drag and drop Shopify web page builders, which is highly useful for creating landing pages for sales promotions.
In my past, I used to work for the number one Shopify partner agency called BVA (Brand Value Accelerator).
I saw multiple Shopify stores use Zipify to continually drive sales. Trust me; it works, ladies and gentlemen. Try Zipify.
Keep in mind product descriptions act as sales associates to facilitate the sale of your product.
It would be wise to test your product titles and descriptions. As a rule of thumb, consider the following when writing product titles and product descriptions.
4 best practices for product pages
1.) Speak to your audience
Communicate needs over wants. Visitors who come to your Shopify store want to buy but need to feel confident buying your product.
Refer back to what you observed about the grill. Look at how the description instilled confidence in the user. That is an excellent example of speaking to your audience.
2.) Scan proof your product pages
Descriptions should be easy to read include subheadings, short paragraphs, and bullet points.
3.) Include FAQs
Identify the bottlenecks in the purchase cycle. Are your visitors afraid of buying the wrong size? If so, include a sizing chart. Eliminate any reason not to buy a product from your Shopify storefront.
4.) Include a USP
Marketing has a name for product differentiation called USP. It stands for (Unique Selling Point). Can you offer returns?
What about free shipping domestically or internationally. Are your products environmentally friendly? Ask yourself what you can include to make your product stand out. What is your USP?
How to upload media to your Shopify Store
You will need images to add to your store. To add images, select “Add file” in the media section within the products page section. You can upload the following media formats.
- Videos
- 3D models
- GIFs
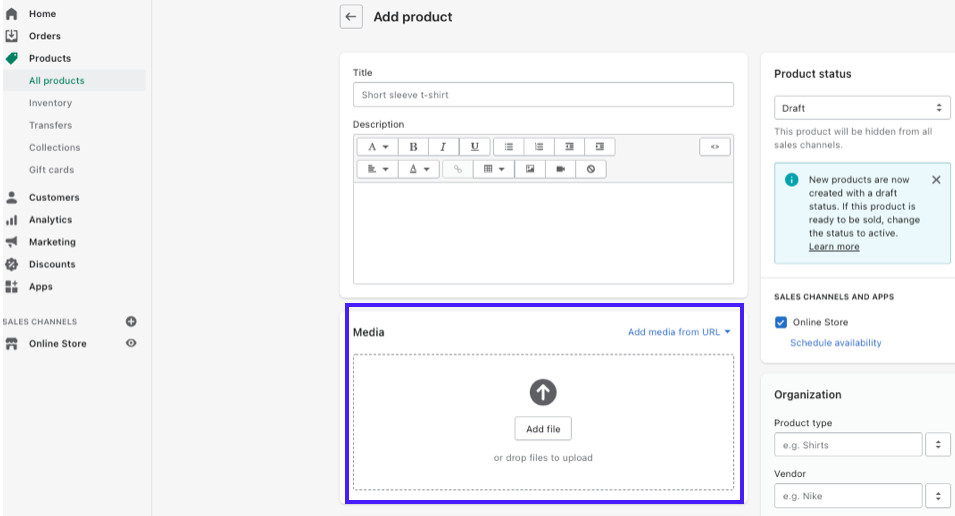
Rule of thumb when uploading media to Shopify
- Use Jpeg images as an SEO best practice. Jpegs reduce load time on your site.
- Use the right width and height ratios, which is important for mobile visitors.
- Add Alt Text to images by applying specific unique names for each image.
Growth hack tip #2
Optimize your images for Google discover. Google Discover is a feed that appears on the homepage of Google mobile search apps.
Google discover displays large images that will entice more people to click on your site. Here is what Google discover looks like.
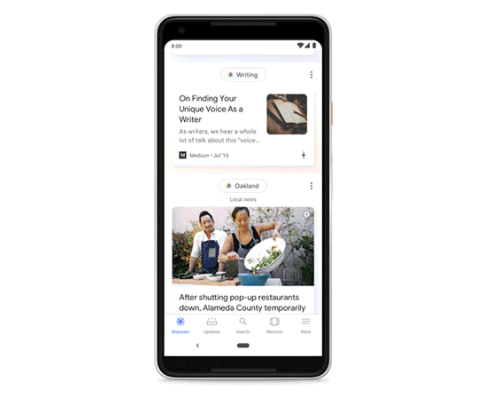
If you would like to learn how to appear in Google discover, you can read my step- by-step guide titled what is SEO and how it works.
I break down all of Google’s search features and show you exactly how to appear in differentiated Google search results.
There are a lot of non-standardized Google search results now and days. I highly recommend reading my SEO guide to understand each search feature and how to appear within each one.
How to set up your ecommerce prices
Listing your price too high or too low can make or break ecommerce stores. I recommend using the compare at price setting to state the typical cost for your products.
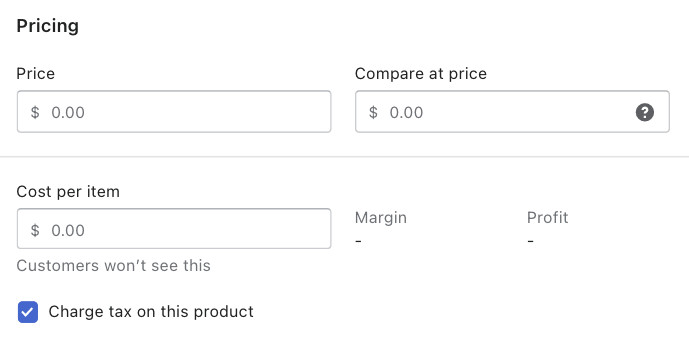
I especially recommend this tactic during the holidays, when sales specials will need to be put in place to compete with other retailers.
If you plan to sell luxury items, a word of caution, utilize this sparingly since it may reduce the perceived exclusivity of higher-priced items.
Growth hack tip #3:
Use the cost per item feature. You will be able to track your profit margin per item sold.
Keep in mind lower prices do not always create more sales. In many cases, visitors to your ecommerce store will assess the product quality by the price point you have dictated.
Price testing is key to the success of ecommerce sites. As a word of caution, do not perform A/B testing on prices for the same product offering. A/B testing prices for the same product is illegal.
The keyword here is the same product. Let’s dive into more detail so you can test your price points once your Shopify site is live.
How to legally split test prices
Here is an example of how you would go about split testing price points legally. Take a close look at the example below.
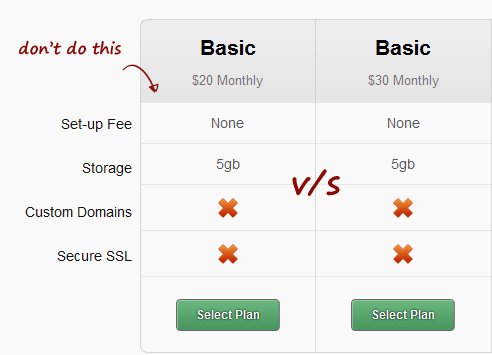
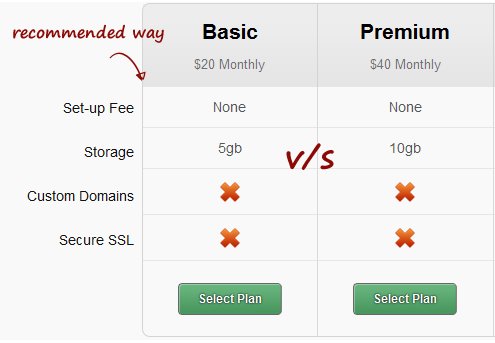
The only difference above is the storage amount offered in this example, which creates a unique product offering. For ecommerce, this can take the form of an accessory item added to a product to differentiate the price point.
E.g., Selling a pair of shoes with the default shoelaces vs selling the same pair with two additional shoelaces that are different colors.
If you add a slight price adjustment for adding two shoelaces, you sell a unique product, thus making it a legal testing practice.
The key here is to make a slight adjustment to gauge how your sales would increase with something low in cost. Price testing without product differentiation is seen as being discriminatory.
To test the example I mentioned above for your specific products you can use Zipify the Shopify app I mentioned earlier.
Setup your product Inventory
This part will vary for those who choose to use Shopify dropshipping or use Shopify’s print-on-demand service. Both options don’t necessarily require you to keep track of inventory.
If you have to keep track of physical products, you will need to be familiar with SKU numbers, barcodes, and quantities.
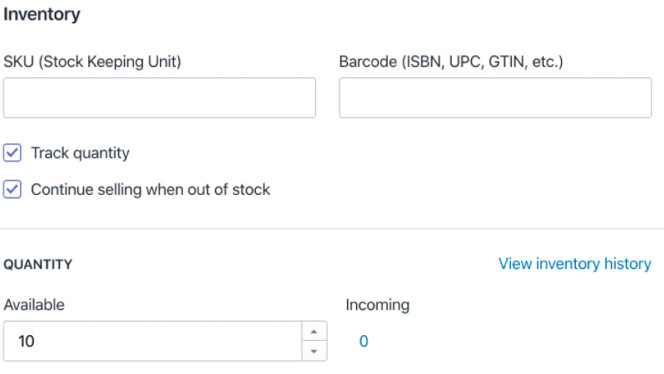
What is an SKU number?
SKU (Stock Keeping Unit) is used to track inventory for retail products. A SKU number requires consistent numerical or letter-based tracking that allows you to identify specific products. E.g, blue water bottle. (Blu-WB) Blu=blue WB= Water bottle.
Bar codes (ISBN, UPC, GTIN, etc.) are primarily used for reselling products.
Quantity is the number of items you have in stock. Shopify provides you with the option to continue selling when out of stock. Additionally, you have the option to choose sold out.
Step 3.) Create key pages & product variants
How to set up a collections page in Shopify
Navigate to “Product” click “Collections” Shopify will give you the option to add products to collections or automate what is included manually.
Shopify gives you the option to:
- Display specific collections on the homepage
- Link collection pages in your top navigation
- Curating sales collections
I recommend that you implement all three above. If you have variant options for the same product, such as different sizes and colors, Shopify can add the product variants to your page.
Setting up Shopify product variants
To set up product variants for your pages, click “This product has multiple options” While Shopify product variants offer flexibility, Shopify does not eliminate manually updating specifics around your product variants.
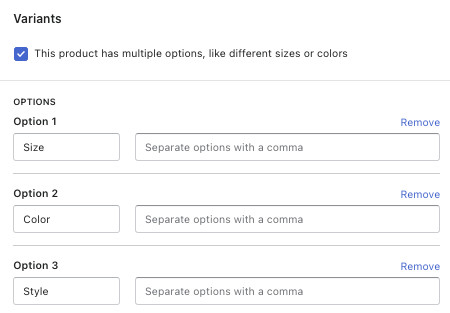
You will need to update the following for each product variant.
- Media (Upload product variant images)
- Pricing (Differentiated price points if applicable)
- Inventory (Specific count for variants)
Managing Shopify product organization
Managing your product catalog can be a difficult task when you have multiple products. This is not the case when setting up a Shopify store.
The organization section makes it easy to manage multiple products. Apply labels to your products so Shopify can group products together to better manage your catalog.
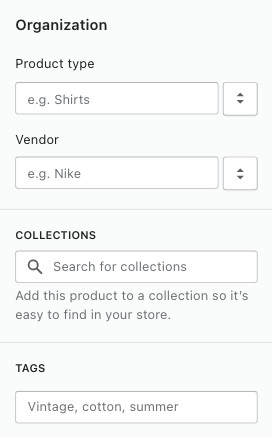
Here is the break down of the labels:
- Product type. Each product must contain only one product type.
- Vendor. The wholesaler, manufacturer, or third party vendor.
- Collections. You can add the same product to multiple collections.
- Tags. Tags automate actions to help form collections.
I have primarily touched on products at this point, but your ecommerce site will need more pages other than product pages to be successful.
You will need to educate your visitors on what differentiates you from the rest of the ecommerce stores online. Navigate to “Online Store,” click “Pages.” I recommend that you create the following pages.
Add a contact page
Give visitors a way to contact you if they have questions. Here is an excellent example of a contact page
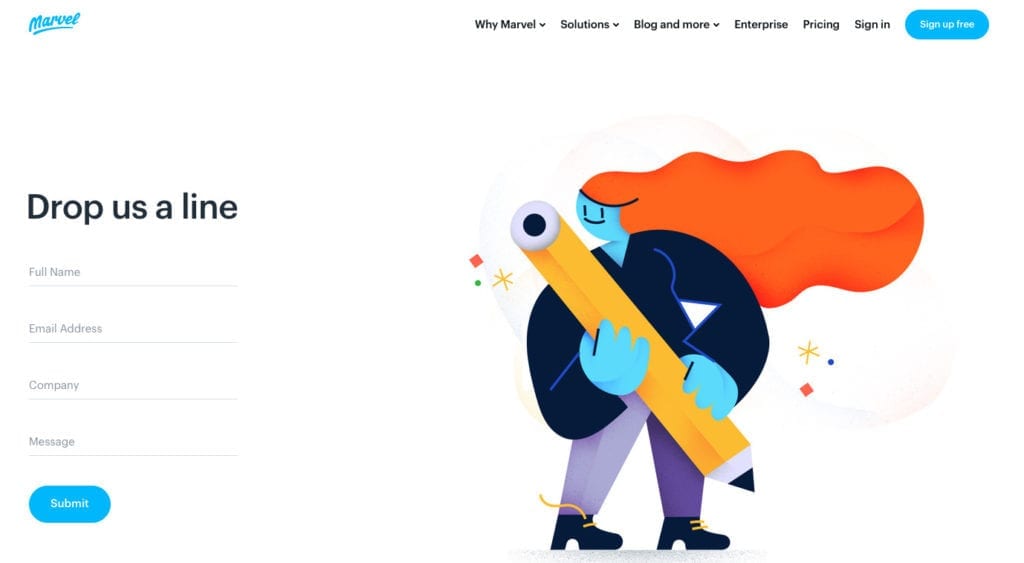
Notice how fun Marvel makes this about page look. They lower the barrier to contact them by adding a playful element.
Make an about page
The about page has the power to push visitors to purchase if you give them a compelling reason to purchase from you.
Here is an excellent example of an about page:

Telling a powerful story is an excellent way to persuade potential customers to become purchasing customers.
Notice how a mission statement is presented. Additionally, each person who works for Convertkit has a short profile summary when you click on any employee image.
By the way, Convertkit is an automated email provider for driving sales. I recommend using this software once you are up in running.
Take a look at the chart below that surveyed business owners about which specific traffic channels drove the most sales:

As depicted in the chart, email was the highest performer for driving sales. Convert Kit directly integrates with Shopify.
Create an FAQ page
A FAQ page is pure gold for ecommerce sites. FAQ pages will help you answer any questions visitors or existing customers may have to reduce your call volume and email messages to your customer support team.
Here is an excellent example of an FAQ page:
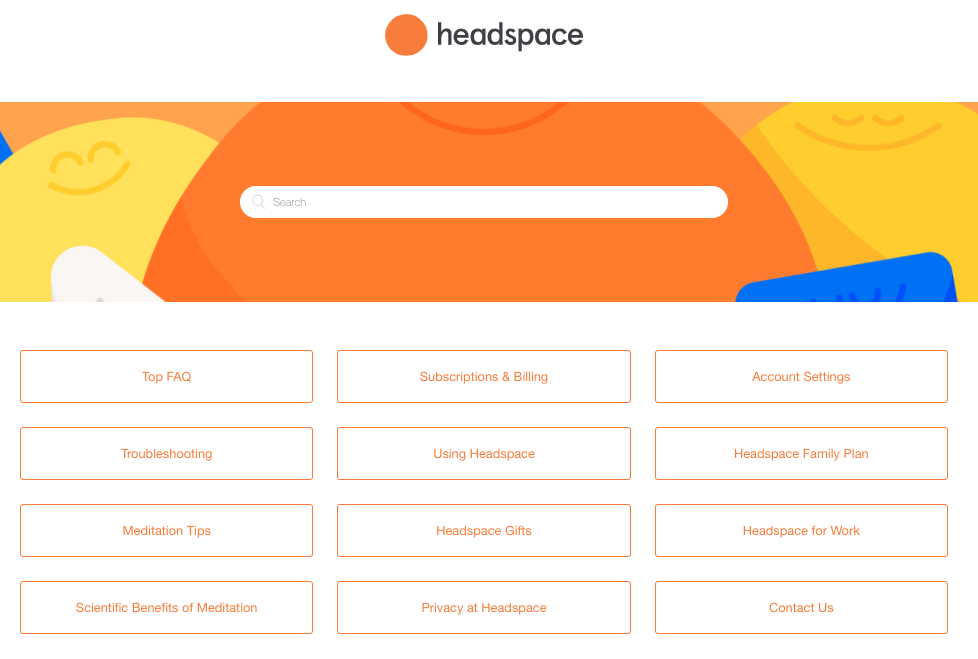
Headspace went the extra mile to add a search bar for visitors to type in specific questions that are top of mind. They also include “submit a request” for any topics they have not covered.
Use a policy page template
From a legal standpoint, any lawyer would suggest you have this in place. I recommend it as well, even though I haven’t passed the bar yet 🙂 Luckily Shopify produces templates for you to use. Navigate to “settings,” click “Legal.“
Include a terms of service page
The terms and service page serves as an agreement between your organization and the customers you service. I recommend you add this page as well since this would also fall into legal waters.
Step 4.) Configure shipping settings
Shopify will calculate shipping rates for you. To set up shipping details, navigate to “Settings” click “shipping and delivery.“
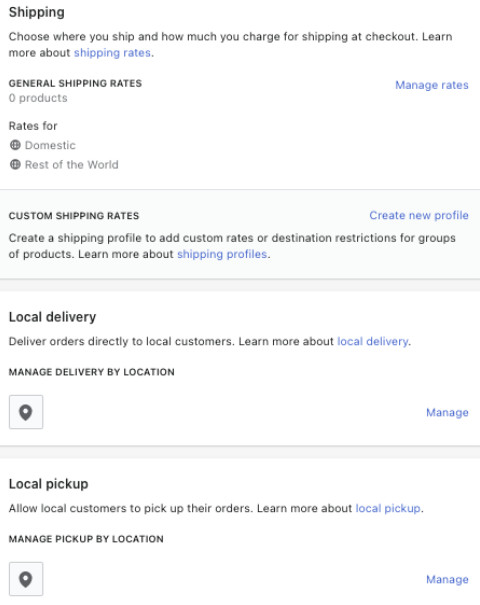
Shipping considerations for ecommerce
- Product weight
- Packaging costs
- Shipping destinations
- Carrier rates
- Potential profit per order
All of the shipping variables will be in your court to decide based on the products you sell, but I recommend paying close attention to three critical factors.
- Offering free shipping – This is a standard with most retailers online.
- Providing real-time carrier rates – Shopify integrates with USPS, Canada Post, and DHL, to learn more, visit the Shopify shipping page.
- Flat rate pricing I suggest flat rate shipping if your products have similar sizes and weights. This will reduce your shipping fees.
Selling physical products on Shopify
You will be provided with printable shipping labels for any physical products.
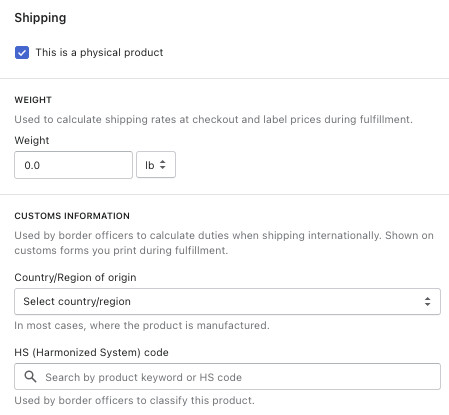
Make sure to click “This is a physical product” and then enter more details around your product.
- Weight
- Customs information
I urge you to keep your products light in weight to avoid high shipping rates that can eat into your margin.
For customs, you will have to enter your country of origin. Use the search bar within Shopify to find the harmonized system code for your specific products.
What is a harmonized system code?
UN trade statistics define the harmonized system as an international nomenclature classification of products. Participating countries classify traded goods with a six-digit code.
Step 5. ) Set up ecommerce SEO
SEO (search engine optimization) is the process of optimizing web pages to increase your site’s visibility in the SERPs (search engine result pages).
Shopify search engine listing preview
Shopify provides a search engine listing preview so you can view how your pages will appear in search results. You can customize the appearance of any page.
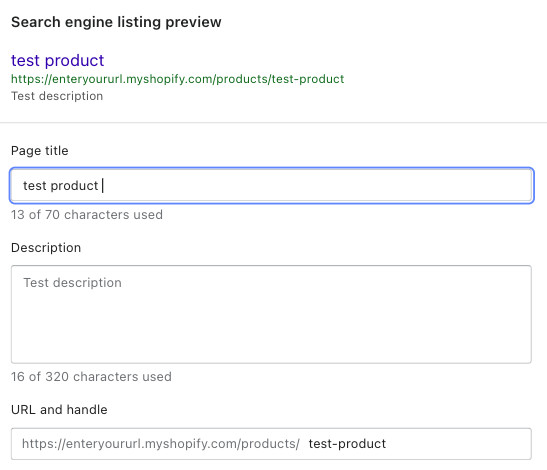
3 key ecommerce SEO best practices
- Page title. Include your target keyword here, but keep in mind that the title length has to be 60 charters long for SEO best practices.
- Description. Your description serves as a sales copy. Include your keyword within your description, and keep in mind SEO best practice is to keep your description to a max of 160 characters long.
- URL and handle. Keep your URL meaningful and straightforward and unique. As you start to add more products, this will become a bit more complex. Include your target keyword in your URL and keep in mind SEO best practice to keep your URL under 200 charters in length.
I wrote a detailed guide explaining what is SEO and how it works that breaks down how Google selects and indexes web pages. Once your ecommerce site is up and running, make sure to read it for some very useful tips.
How to optimize keywords for ecommerce SEO
I recommend using SEMrush so you can find the estimated monthly search volume for specific keywords. Once you find your set of keywords, place them strategically within your titles, descriptions, URLS, and alt text to gain more search traffic.
Make sure to sign up for the 7-day free trial offer to take advantage of more advanced features.
Do not aim for the highest search volume since it will be too competitive to compete. Target keywords below 1,000 monthly searches.
Step 6.) Customize your store
The way you choose to customize your ecommerce store will be entirely up to you. I recommend that you take design inspiration from leading ecommerce retailers.
As I mentioned earlier in this guide, large ecommerce sites spend a significant amount of time optimizing pages for optimal purchase potential.
Simply research leading ecommerce sites that sell similar products you plan to sell and mimic the design layout. Let your competitors do the heavy lifting for you.
How to customize a Shopify store
Navigate to “online store,” click “themes,” you will be presented with a lot of Shopify themes from the Shopify Theme store.
I recommend that you don’t spend a significant amount of time looking through designs as you can always switch to different Shopify themes.

Remember, the focus should be launching your site to generate sales vs. how pretty the site looks. Design is essential, but the function is critical over the design element to create sales.
Shopify charges an additional fee for specific themes. But Shopify will let you take a theme for a test drive before purchasing, which means you can demo it.
Click “Start with this theme” to take it for a test drive before you buy a theme for a one-time fee.
What are some Shopify theme details you should know?
- Every theme has multiple styles to configure the layout.
- Consider built-in features that come with themes.
- You can customize colors and fonts with any theme you select.
If you find that the Shopify theme designs are not to your liking, you can find some of the best Shopify themes on ThemeForest. Usually, ThemeForest themes have lower prices in comparison to the Shopify theme store.
Recommended ecommerce navigation elements
Include the following navigation elements in your Shopify ecommerce store.
- Sub-navigation to add additional paths for your visitors upon site entry.
- Search bars for large catalogs to help the visitor navigate to specific products.
- Account sign up to incentivize larger purchases by offering bulk discounts.
- Login link for returning users to check on pre-existing orders.
- The about page for educating visitors about who you are and builds trust.
- Collection pages to make products quickly accessible upon entry into the site.
- Discount/sales page to incentivize visitors to purchase more immediately.
- New product pages to incentivize visitors to purchase.
- Blog to link to product description pages in posts.
ecommerce homepage design best practices
- Personalize last viewed items for returning customers.
- Focus on intent to purchase by highlighting sales promotions.
- Keep in mind mobile-first visitors and how content will be displayed.
- Include a carousel to capture visitor interest immediately on key pages.
ecommerce checkout page best practices
Under “Theme Settings,” Shopify gives you the option of customizing your checkout page.
Here are some recommended elements to add to your checkout page:
- Brand logo & security logos are useful for instilling trust in visitors; it reinforces buying from a reputable company.
- Customer account creation is needed to be able to personalize collections from past viewed items to logged-in visitors.
- Customer contact information is useful for remarketing to customers through email newsletters. Look into Convert Kit as a email provider,
- Auto generated billing address. Use the customer’s shipping address as the billing address by default since it will not be differentiated most of the time.
- Abandoned checkout notifications are useful if a visitor does not complete the intended action.
After adding a theme, adding key pages, and customizing your checkout page, ask for feedback. You can start by asking your peers first.
Here are a few other places to consider gathering design feedback:
- Feedback on my store forum by the Shopify Community.
- Join my Facebook group for entrepreneurship
- Subreddits within your specific vertical on Reddit.com
Step 7.) Select your tax settings
Taxes are unfortunately a reality, but fortunately, Shopify automatically will handle most of your tax calculations. Shopify defaults to pre-existing sales tax rates already in place internationally.
I recommend you check your default tax rate against your region-specific tax requirements.
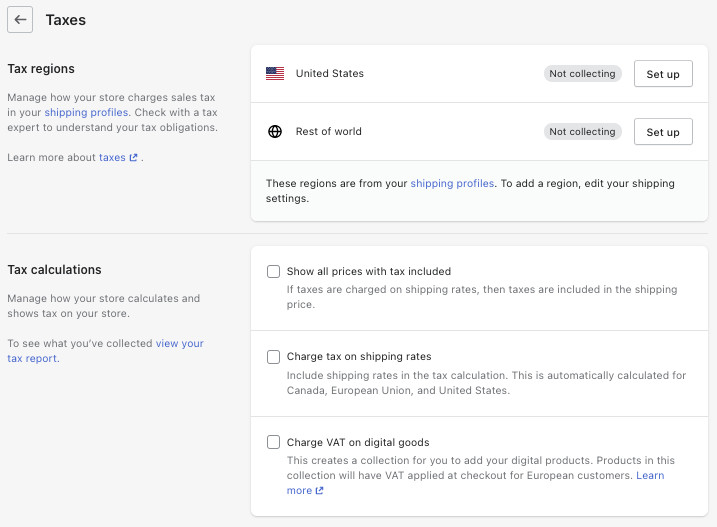
How to set up Shopify ecommerce taxes
To adjust your default tax rates, navigate to “Settings” click “Taxes” I recommend setting up a custom report from a default template labeled ” Taxes collected overtime” to keep track of how much tax is collected. Set up a custom dashboard, navigate to “Analytics,” click ” Reports.”
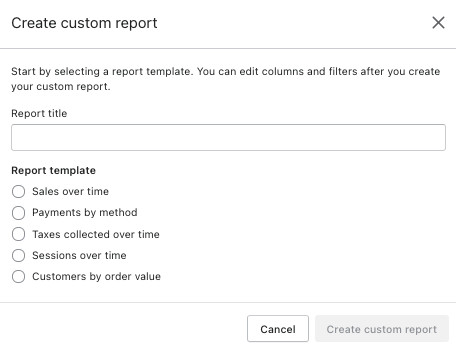
I recommend you check with a tax professional if you’re unclear about any tax concerns you may have.
Provide a business license & EIN
The Small Business Association offers resources to help you set up a business license.
There are significant benefits to registering for a business license. For instance, once you have filed, you can start to claim tax deductions.
What is an EIN?
EIN (Employer Identification Number) is a unique number that identifies your business and helps you file important paperwork during tax time.
An EIN is necessary to open a business bank account and to file business taxes.
Possessing an EIN is required even if you plan on not having any employees. For more information on ecommerce taxes, read this tax advice resource.
Step 8.) Set up payment processing
How to set up ecommerce payment gateways
To set up your payment processing in Shopify, navigate to “Settings” click “Payments“ you have the option to select Shopify Payments where there will be 0% in transaction fees. You also have the opportunity to choose over 100 third-party payment providers.
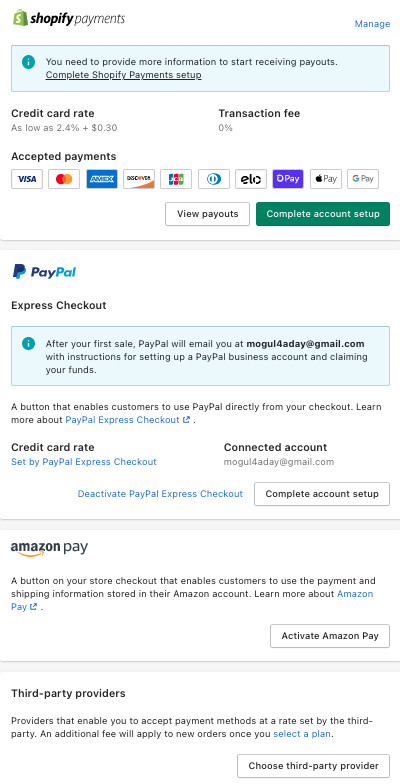
Check that your specific country is listed in the supported countries for payment processing.
Recommended settings to configure for payment processing
- Configure multiple currencies. By configuring this option, you will convert your product prices into the customer’s currency if you are selling internationally.
- Set your payout schedule. You can receive your payout daily, weekly, or monthly—it all depends on your cash flow preferences.
- Extra fraud prevention. This option will add a high level of verification for additional security measures.
- Customize bank statements. This option will display how people who have purchased your products will see the charge you apply to their statements.
Step 9.) Prepare for launch
To launch your Shopify website, you will have to disable the password protection since your site is not live yet. To disable the password protection screen, navigate to “Online Store” click “Preferences.”

Here are the final items you will have to configure before your set your site live.
- Add a custom domain
- Customize your email notifications
- Add additional sales channels
- Set up tracking & analytics.
Adding a custom domain
Within the introduction of this guide, I provided a tool to check a domain name’s availability. If you haven’t registered a domain name, navigate to “online store” click “domains” Shopify allows you to purchase a domain name directly on the platform.
You can also transfer pre-existing domain names if you have one.
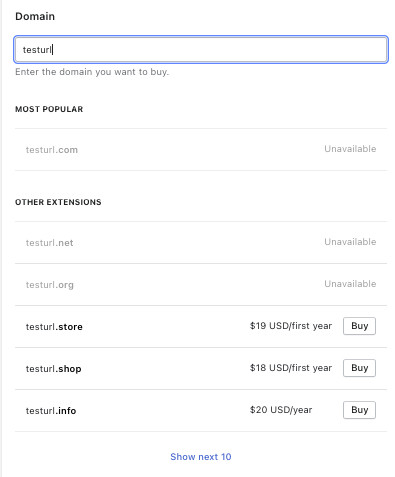
Customizing notifications (Optional)
Configuration of automated emails and SMS push notifications is useful for informing your customers about order confirmations, new inventory, back-in-stock inventory, and much more.
To configure both automated emails and SMS, push notifications, navigate to “Settings,” click “Notifications“.

Implement additional sales channels (Optional)
Shopify gives you the power to add multiple sales channels to your store. To implement various sales channels, navigate to “Sales channels,” click the plus symbol next to “Online store”
Here are a few channels to explore setting up if applicable to your business model.
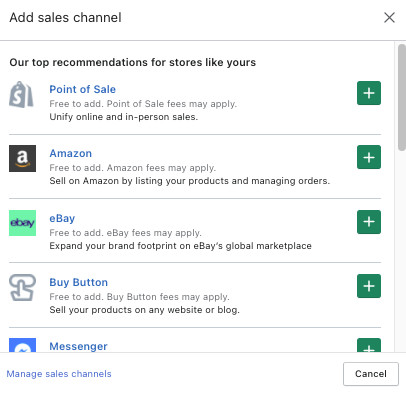
- Shopify POS. If you plan to sell physical products in-person, you can enable the Shopify POS for brick and mortar retail sales.
- Social networks. Shopify gives you the ability to sell your products through Facebook fan pages, Instagram posts, Pinterest, and more.
- Marketplaces. Shopify gives you the ability to sell your products on third-party retailers like Amazon.com and ebay.com.
- Google channel. You have the option of deploying Google Shopping campaigns for your products for free.
- Buy button. You have the option to add a buy button to third-party websites to customers.
You have a ton of options. Select which ones are best for your business model.
Set up your analytics tracking
By default, Shopify provides sales analytics, so you will be able to track sales. To view your analytics data, navigate to “Analytics,” click “Reports,”
I also recommend setting up Google Analytics for more granularity.
Facebook pixel for Ecommerce
I recommend you implement the Facebook pixel to be able to drive sales at a faster pace.
What is the Facebook pixel?
Have you ever seen an ad pop up that seems to be reading your mind? This is due to third party software that uses cookies. Several third-party software exists that perform remarketing similar to the Facebook pixel, but the Facebook Pixel is regarded as one of the best.
What exactly is a Facebook pixel good for?
The Facebook pixel tracks visitors that have made purchases and visitors that have added products to the cart.
The pixel is handy for remarketing to your visitors since it collects detailed information about your visitors using proprietary software.
Here is a list of events Facebook can track to help you retarget customers.
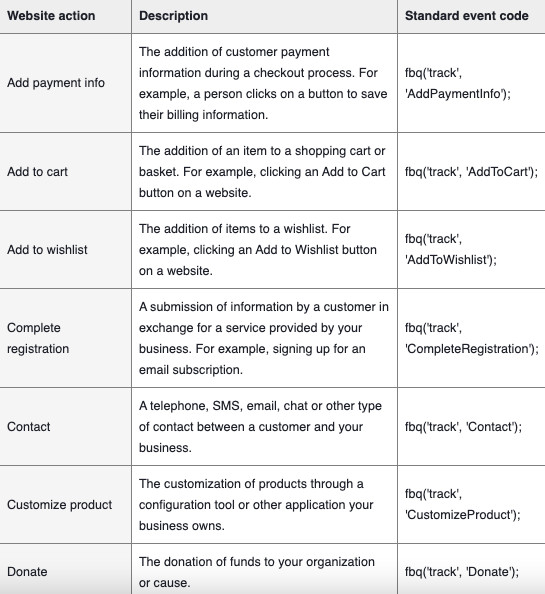
You are not just limited to the interactions listed above. The Facebook pixel allows for far more customization to aid your marketing efforts.
Step 10.) Launch your ecommerce store
Now the time has come to launch your ecommerce store. I went through many details of how to configure your setup within Shopify, but the journey is not over.
To gain traffic to your ecommerce store, you will have to be proactive in your marketing to drive sales. Below I have included some commonly asked questions when you are new to starting an ecommerce site.
ecommerce FAQs
What is AOV?
Average order value is a metric used to determine the average order amount generated from an ecommerce store.
The calculation for AOV is performed by dividing the revenue by the number of orders received within a given period.
What does COGS stand for?
COGS (Cost Of Goods Sold) is the cost of producing the products you sell. COGS includes the cost of the materials and labor expenses to produce the product. It excludes logistic costs and marketing expenses.
The formula for COGS is (Beginning inventory + purchases – ending inventory)
What does ATC stand for?
ATC (Add To Cart Rate) This is the percentage rate of visitors who have added their carts.
The ATC formula is (Traffic to your ecommerce store / the number of products added to cart).
How to increase your add to cart rate?
- Create clear paths for visitors to purchase
- Differentiate your products from your competitors
- Place a strong CTA above the fold
- Add a live chatbot to troubleshoot issues quickly
- Create a sense of urgency for visitors to purchase
What does CLTV stand for?
CLTV (Customer Lifetime Value) Is the measurement of a visitor’s life cycle that purchases your products/ services over time.
The CLTV formula is a combination of several other formulas to form the total customer lifetime value.
- Average purchase value formula- (Total revenue/number of purchases )
- Average purchase frequency rate formula- (Total number of purchases /unique customer purchases )
- Customer value formula- (Average purchases x average purchase frequency)
- Calculate average customer lifespan- (Sum of customer lifespan/ number of customers )
- CLTV formula (Customer value x average lifespan)
How can I reduce cart abandonment from visitors?
- Target abandoners with remarketing
- Identify bottlenecks in your conversion funnel
- State shipping cost upfront vs. at checkout
- Utilize guest checkouts
- Offer a money-back guarantee
I would love to hear from you; please leave a comment below. What are the biggest challenges you faced setting up a Shopify store?
What ecommerce advice can I help you with?

Leave a Reply